Posts By :

Roderick Derks

La Ronde Picarde 2011 200 156 Roderick Derks

La Ronde Picarde 2011

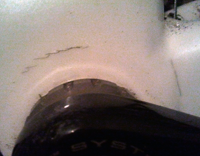
De maandag na La Cyclo’Manche moet mijn fiets voor wat onderhoud naar de fietsenmaker en daar krijg ik verassend nieuws. Er zit een scheur in het frame bij de bracket, eigenlijk twee scheuren. En dat betekent einde verhaal voor het frame. Omdat de fiets nog binnen de garantie valt zal Specialized het frame vervangen. Even schrikken maar gelukkig snel bekomen. Voordeel is een nieuw frame, nadeel is dat de kleuren van de nieuwe lijn me niet echt aanspreken. Kan er nog even over nadenken want La Ronde Picarde staat voor de deur en die kan ik nog wel rijden op m’n huidige frame.

read more

La Cyclomanche 2011 200 112 Roderick Derks

La Cyclomanche 2011

Na twee maanden zonder cyclo’s maar toch een aardig aantal trainingsuren net als vorig jaar weer naar Normandië afgezakt om La Cyclomanche te rijden. Op vrijdagmiddag vertrokken en ergens overnacht. De volgende dag via een kustweg een een lunch in Port-en-Bessin-Huppain aangekomen in Manche. Mooie dag met veel zon en een lekker biertje op een terras in Saint-Vaast-La-Hougue.

read more

vSphere5 new HA architecture 150 150 Roderick Derks

vSphere5 new HA architecture

vSphere5 comes with a completely new HA architecture. There is no more AAM agent like in vSphere 4.1. Instead, there has been a new agent introduced which is named FDM – Fault Domain Manager. The Primary/Secondary concept with 5 primary nodes which has been known in vSphere 4, is gone. You no longer needs to worry not to loose all those 5 primary nodes at the same time and loose the HA functionality for the rest of the cluster. Now there is only one agent in the cluster which plays the role of Master. The agent is called FDM – Fault Domain Manager. One host takes the role of Master. The other agents on other hosts plays only roles as a Slaves, and can became Masters in case the master fails.

The master monitors the availability of ESXi 5 hosts and also the VM availability. The master agent also monitors all slave hosts and in case this slave host fails, all VMs on that host are restarted on another host.  Within each individual host the status of each protected VM is monitored and if a failure of that protected VMs happens, the master proceeds with the restart of this VM. The FDM master keeps a list of VMs being protected, which is updated after every power off or power on status initiated by user. FDM master keeps track of all hosts being a members of a cluster, any adding/removing of hosts refresh this list as well.

When the master fails there is a re-ellection process (this was not the case in vSphere 4) and the host which has an access to the greatest number of datastores is elected as a master. Why's that? It’s because the secondary communication channel is through datastores. The next consideration is the MoID number of a host.

The hosts with slave roles maintain a direct point-to-point TCP connection (no broadcasts) which is encrypted, with the Master. The election process is done via UDP, and then again only via SSL encrypted TCP the communication between the Master and the slaves are maintained.

The host with the master role sends periodically reports states to vCenter. The slaves are informed that the Master is alive via heartbeats. The slaves monitors the state of their locally running VMs and any changes are transmitted to Master. The Slave sends a heartbeats to master and if master should fail, the re-election process occurs. vCenter knows if a new Master is elected, because it’s the new master which contacts vCenter after the re-election process is finished.

The secondary channel through datastores is known as a Heartbeat Datastores.  But this secondary network is not used in normal situations, only in case the primary network goes down. This secondary channel permits the Master to be aware of all Slave hosts and also the VMs running on those hosts. The Heartbeat datastores can also determine if host became isolated or network partitioned. The secondary channel can determine if host is failed (PSOD) or if it’s just isolated. HA likes you to have at least 2 shared datastores for each ESXi host, but you can enable it with just one shared storage but you will get a warning message on the host's front page in the VI Client.

How does this heartbeating mechanism work? HA leverages the existing VMFS filesystem locking mechanism. The locking mechanism uses a so called “heartbeat region” which is updated as long as the lock on a file exists. In order to update a datastore heartbeat region, a host needs to have at least one open file on the volume. HA ensures there is at least one file open on this volume by creating a file specifically for datastore heartbeating. In other words, a per-host a file is created on the designated heartbeating datastores, as shown in the screenshot below. HA will simply check whether the heartbeat region has been updated.

So in my opinion for this to work you need to have your iSCSI and NAS network physically seperated from your ESXi management network containing the heartbeat. FC networks are seperate by default offcourse.

In case of a ESXi host going down while a re-election process is going on, the VMs on this host will be restarted as soon as the new master is elected.

In the scenario of when a Geo-Dispersed cluster is split in two sites due to a link failure, each “partition” will get its own master. Still only 1 master will communicate with vCenter so the data reflected by vCenter might not be 100% accurate.

FDM will work with vCenter5 and ESXi4 hosts. FDM will replace the AAM agent on ESXi4 hosts. The HA concept completely different from ESX4 and before. For instance enabling HA on 32 nodes will take a minute or so to configure, the HA agent is pushed out in parallel instead of serial with 4.1 and prior.

One more important thing: HA no longer uses DNS  – it means there is no dependency on DNS or hosts files.


presentation: e. sloof, text: vladan.fr d.epping r.derks

ESXi 5 Scripted Install to USB Flash 150 150 Roderick Derks

ESXi 5 Scripted Install to USB Flash

One of the great features of VMware vSphere is the capability to boot VMware ESXi from USB flash — eliminating local storage and array controllers can reduce the acquisition and operational costs for hypervisor hosts.

Now with VMware ESXi 5, it is possible to perform an automated installation to USB storage.  Simply specify usb-storage as part of the install command in an automated install script.  For example:

install --firstdisk=usb-storage --overwritevmfs

For more flexibility in a single script, multiple disk types can be specified; they will be tried in order.  Below is an example install command from a script for HP servers.  If USB flash is not installed, the on-board SAS disks will be used.  If neither are present — such as when installing virtual ESXi systems — generic local storage is the last resort.

install --firstdisk=usb-storage,hpsa,local --overwritevmfs


Individuele tijdrit in Waarde 200 150 Roderick Derks

Individuele tijdrit in Waarde

Een fietsmaat van me twitterde laatst dat hij een criterium had gewonnen in Zeeland. Heel erg leuk, en ook jaloersmakend. In mijn korte fietscarriere heb ik nog geen wedstrijdje gewonnen en het zou wel erg leuk zijn om eens op de hoogste trede van een podium te mogen klimmen.

Dus ging ik op onderzoek uit, hoe komt hij aan die wedstrijdjes.

read more

Single SSL proxy to multiple SSL and non-SSL domain names 150 150 Roderick Derks

Single SSL proxy to multiple SSL and non-SSL domain names

After some puzzeling I found the way to create a SSL web proxy that connects to SSL and non-SSL websites. This is an example of the VirtualHost configuration in the ssl.conf file.
Read more about creating ssl websites here.

NameVirtualHost *:443

<VirtualHost *:443>
    ServerName site_no_ssl.r71.nl
    SSLEngine On

    SSLCertificateFile /etc/pki/tls/certs/localhost.crt
    SSLCertificateKeyFile /etc/pki/tls/private/localhost.key

    ProxyPass / http://site_no_ssl.r71.nl/centreon/
    ProxyPassReverse / http://site_no_ssl.r71.nl/centreon/
</VirtualHost>

<VirtualHost *:443>
    ServerName other
_site_no_ssl.r71.nl
    SSLEngine On

    SSLCertificateFile /etc/pki/tls/certs/localhost.crt
    SSLCertificateKeyFile /etc/pki/tls/private/localhost.key

    ProxyPass / http://other_site_no_ssl.r71.nl/
    ProxyPassReverse / http://
other_site_no_ssl.r71.nl/
</VirtualHost>

<VirtualHost *:443>
    ServerName site_with_ssl.r71.nl

    <Proxy *>
        Order deny,allow
        Allow from all
    </Proxy>

    SSLEngine on
    SSLProxyEngine On
    SSLCertificateFile /etc/pki/tls/certs/localhost.crt
    SSLCertificateKeyFile /etc/pki/tls/private/localhost.key

    ProxyRequests On
    ProxyPreserveHost On
    ProxyPass / https://site_with_ssl.r71.nl:443/
    ProxyPassReverse / https://
site_with_ssl.r71.nl:443/
</VirtualHost>

How to create a self-signed SSL Certificate 150 150 Roderick Derks

How to create a self-signed SSL Certificate

Step 0: Install Apache module mod_ssl

# yum install mod_ssl
# service httpd restart

Step 1: Generate a Private Key

The openssl toolkit is used to generate an RSA Private Key and CSR (Certificate Signing Request). It can also be used to generate self-signed certificates which can be used for testing purposes or internal usage.

The first step is to create your RSA Private Key. This key is a 1024 bit RSA key which is encrypted using Triple-DES and stored in a PEM format so that it is readable as ASCII text.

openssl genrsa -des3 -out server.key 1024

Generating RSA private key, 1024 bit long modulus
…………………………………………………++++++
……..++++++
e is 65537 (0x10001)
Enter PEM pass phrase:
Verifying password – Enter PEM pass phrase:

Step 2: Generate a CSR (Certificate Signing Request)

Once the private key is generated a Certificate Signing Request can be generated. The CSR is then used in one of two ways. Ideally, the CSR will be sent to a Certificate Authority, such as Thawte or Verisign who will verify the identity of the requestor and issue a signed certificate. The second option is to self-sign the CSR, which will be demonstrated in the next section.

During the generation of the CSR, you will be prompted for several pieces of information. These are the X.509 attributes of the certificate. One of the prompts will be for "Common Name (e.g., YOUR name)". It is important that this field be filled in with the fully qualified domain name of the server to be protected by SSL. If the website to be protected will be https://hostname.360viewpoint.nl, then enter hostname.360viewpoint.nl at this prompt. The command to generate the CSR is as follows:

openssl req -new -key server.key -out server.csr

Country Name (2 letter code) [GB]:NL
State or Province Name (full name) [Berkshire]:NB
Locality Name (eg, city) [Newbury]:'s-Hertogenbosch
Organization Name (eg, company) [My Company Ltd]:Roderick ICT Consultancy
Organizational Unit Name (eg, section) []:Information Technology
Common Name (eg, your name or your server's hostname) []:hostname.360viewpoint.nl
Email Address []:info at 360viewpoint dot nl
Please enter the following 'extra' attributes
to be sent with your certificate request
A challenge password []:
An optional company name []:

Step 3: Remove Passphrase from Key

One unfortunate side-effect of the pass-phrased private key is that Apache will ask for the pass-phrase each time the web server is started. Obviously this is not necessarily convenient as someone will not always be around to type in the pass-phrase, such as after a reboot or crash. mod_ssl includes the ability to use an external program in place of the built-in pass-phrase dialog, however, this is not necessarily the most secure option either. It is possible to remove the Triple-DES encryption from the key, thereby no longer needing to type in a pass-phrase. If the private key is no longer encrypted, it is critical that this file only be readable by the root user! If your system is ever compromised and a third party obtains your unencrypted private key, the corresponding certificate will need to be revoked. With that being said, use the following command to remove the pass-phrase from the key:

cp server.key server.key.org
openssl rsa -in server.key.org -out server.key

The newly created server.key file has no more passphrase in it.

-rw-r–r– 1 root root 745 Jun 29 12:19 server.csr
-rw-r–r– 1 root root 891 Jun 29 13:22 server.key
-rw-r–r– 1 root root 963 Jun 29 13:22 server.key.org

Step 4: Generating a Self-Signed Certificate

At this point you will need to generate a self-signed certificate because you either don't plan on having your certificate signed by a CA, or you wish to test your new SSL implementation while the CA is signing your certificate. This temporary certificate will generate an error in the client browser to the effect that the signing certificate authority is unknown and not trusted.

To generate a temporary certificate which is good for 365 days, issue the following command:

openssl x509 -req -days 365 -in server.csr -signkey server.key -out server.crt
Signature ok
subject=/C=NL/ST=NB/L='s-Hertogenbosch/O=Roderick ICT Consultancy/OU=Information
Technology/CN=hostname.360viewpoint.nl/Email=info at 360viewpoint dot nl
Getting Private key

Step 5: Installing the Private Key and Certificate

When Apache with mod_ssl is installed, it creates several directories in the Apache config directory. The location of this directory will differ depending on how Apache was compiled.

cp server.crt /etc/httpd/conf.d/ssl.crt
cp server.key /etc/httpd/conf.d/ssl.key

Step 6: Configuring SSL Enabled Virtual Hosts in the file ssl.conf

SSLEngine on
SSLCertificateFile /usr/local/apache/conf/ssl.crt/server.crt
SSLCertificateKeyFile /usr/local/apache/conf/ssl.key/server.key
SetEnvIf User-Agent ".*MSIE.*" nokeepalive ssl-unclean-shutdown
CustomLog logs/ssl_request_log \
   "%t %h %{SSL_PROTOCOL}x %{SSL_CIPHER}x \"%r\" %b"

or create a virtual host:

<VirtualHost centreon.r71.nl:443>
        ServerAdmin <info at 360viewpoint dot nl>
        DocumentRoot /usr/local/centreon/www
        ServerName hostname.360viewpoint.nl
        ErrorLog /var/log/httpd/error.log
        CustomLog /var/log/httpd/centreon.log combined

        SSLEngine  on
        SSLCertificateFile /etc/httpd/conf.d/hostname.360viewpoint.nl.crt
        SSLCertificateKeyFile /etc/httpd/conf.d/server.key
        #SSLLog /var/log/httpd/hostname.360viewpoint.nl.log
        #SSLLogLevel warn
</VirtualHost>

And you can create a proxy pass on another incoming Apache webserver which serves as a proxy:

<VirtualHost 192.168.0.11:443>
    ServerName hostname.360viewpoint.nl

    <Proxy *>
        Order deny,allow
        Allow from all
    </Proxy>

    SSLEngine on
    SSLProxyEngine On
    #SSLCertificateFile /etc/apache2/ssl/certificate.crt
    #SSLCertificateKeyFile /etc/apache2/ssl/certificate.key
    SSLCertificateFile /etc/pki/tls/certs/localhost.crt
    SSLCertificateKeyFile /etc/pki/tls/private/localhost.key

    ProxyRequests Off
    ProxyPreserveHost On
    ProxyPass / https://hostname.360viewpoint.nl:443/
    ProxyPassReverse / https://hostname.360viewpoint.nl:443/
</VirtualHost>

Read more about building a single SSL proxy with multiple SSL and non-SSL websites bbehind this proxy here.

Step 7: Restart Apache and Test

/etc/init.d/httpd stop
/etc/init.d/httpd start

https://hostname.360viewpoint.nl

This article is published for my own reference. Thanks to acadia.com and JMD.

Linux: which program is using what port 150 150 Roderick Derks

Linux: which program is using what port

netstat -tlnp

netstat -tlnp | grep <portnumber>

How to update a Centreon installation 150 150 Roderick Derks

How to update a Centreon installation

Very simple procedure:

  • service ndo2db stop
    service centstorage stop
    service centcore stop
  • ./install.sh -u /etc/centreon
  • service centstorage start
    service centcore start
    service ndo2db start

Restarting the daemons is needed to make sure the new software is loaded into memory. I.e.: not restarting the service centstorage will result in graphs not being updated anymore.

Troubleshooting Centreon Graphs

Check if service-perfdata is growing. If so then the file is not being emptied by NDO2DB:
# tail -f /usr/local/nagios/var/service-perfdata

Check if Centstorage proces is running:
# ps -ef |grep centstor

Check the centstorage log or errors:
# tail -f /usr/local/centreon/log/centstorage.log
Restart centstorage if you find errors.

Les Cinglés du Ventoux 150 200 Roderick Derks

Les Cinglés du Ventoux

Les Cinglés du Ventoux is een club waar je lid van kan worden als je op één dag de drie kanten van de Ventoux beklimt. Nou, dat leek me wel wat.

Gestart vanuit Bédoin om 6:15 uur om de hitte voor te zijn. De eerste beklimming ben ik helemaal alleen op de Reus van de Provence aan het klimmen. Ik kom geen auto of fietser tegen. Hele aparte ervaring om mee te maken. Na 1:40u boven, als eerste die dag met een strakblauwe lucht.

read more

    Your Name (required)

    Your Email (required)

    Subject

    Your Message

      Your Name (required)

      Your Email (required)

      Subject

      Your Message